Step-by-step instructions for recording with Audacity:
1. Go to the “Start” button in the lower left-hand corner of the screen. Look in programs.
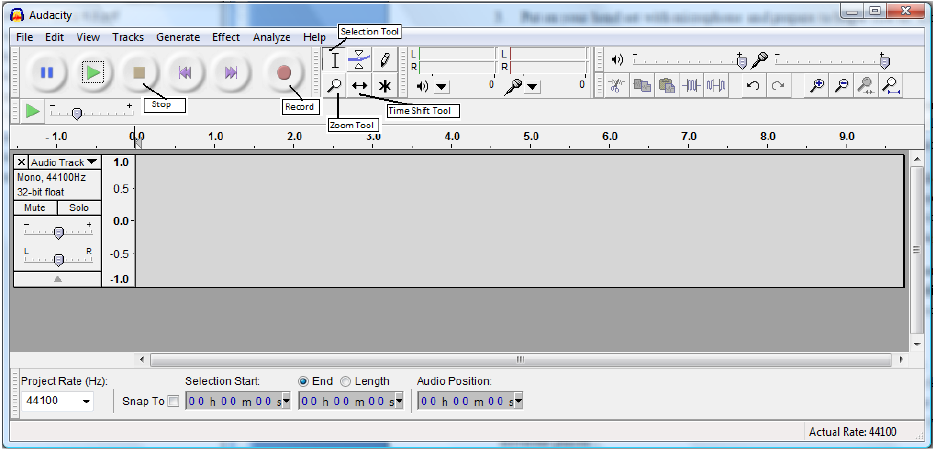
2. Find the program “Audacity” and click on it to open. The program should open to a blank
grey area with some control buttons above.
3. Put on your head set with microphone and prepare to begin (Go to “Control Panel” to
make sure that Audio Input/output is set to your head set).
4. Click on the big red “Record” button to start recording.
5. To talk into the microphone, make sure the receiver side is facing your mouth. Hold the
microphone about six inches from your mouth and speak loudly and clearly. A track box will
shows the recording as it progresses. The recording appears as a mono audio track.
6. Once you are done recording, click the “Stop” button (the square goldenrod button, two
buttons to the right of the record button). If you are not done recording and want to pause in
the middle, hit the “Pause” button, which is directly to the right of the record button. To
begin recording again, click again on the “Pause” button, and the recording will continue.
7. Click “Play” to listen to the recording. (Note: If the recording has not been stopped,
and is just paused, you cannot click on the “Play” button. The recording must be
stopped before you can listen to it). If you are not satisfied with the recording, click the
“X” in the upper left of the track box and re-record.
8. Trim the audio so that it does not have dead space or unwanted noise. To do this, click
and highlight the section that you want to remove. Press “Delete” on the keyboard to remove
the highlighted section. To be more exact, you can click on the magnifier glass tool at the
top right tool bar area. You can click on the timeline to start listening to your audio in
different places.
9. Once you have a track that you are satisfied with, go to “File” menu and click on
“Export…” You can export your file as either MP3 or WAV format. WAV file is the format
for creating music CDs. If you save as an MP3, you can post it in Catfiles so that it can be
shared with your students.
10. You must title the file and specify where you want to save it. Make sure you remember
the name of the file and where it is saved! Once this is done, click “Save”.
11. A small window entitled “Edit the ID3 tags for the MP3 file” will pop-up. You do not
have to do anything in this window except click “OK”. The file is now saved.
Recording multiple tracks: A few basics
1. Import Audio: If you want to import a song, click “File ->Import -> Audio”. Browse an
mp3 song, then click “Open”. The song you imported is a stereo track; together with your
mono audio track, you have two tracks, even though they look like three.
2. Add another mono track: You can record another verse. Or copy-and-paste your
previous recording by highlighting it, then click “Edit -> Copy”. Now click “Tracks -> Add
New ->Audio Tracks”, put your mouse and click in the new track, exactly where you want
your content added and choose “Edit -> Paste”.
3. Time shift tool: You can move the place of your tracks using the “Time shift” tool. Next
to the “Record” button are 6 tools; the bottom middle tool is the one you will choose for this.
After clicking the Tool, click on the track and hold the mouse button while moving it left and
right. You can manipulate the audio on any track with this method. (Note: To re-gain the
normal control, you must choose the selection tool (top left tool next to the record
button – it looks like a capital letter I).
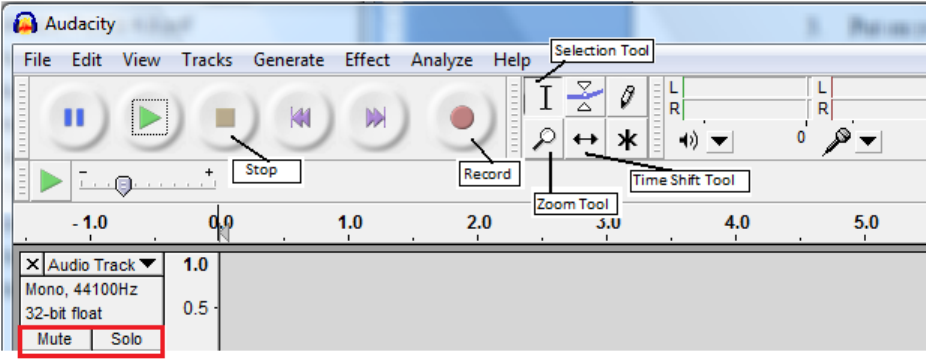
4. Solo/Mute buttons: The left end of a track gives you information about the track. If you
click the “Solo” button, you will only hear that track when you play back. Unclick this button
to hear all the tracks again. If you click the “Mute” button, you will not hear that track on
playback, but you will hear all other tracks.
5. Set a Click track: When recording multiple tracks that you want to be synced (lined up)
correctly, it is useful to set a click track. A click track is just that: a track which is like an
electronic metronome, making a „click‟ noise to the beat you set for it. To set a click track,
go to the “Generate” menu and select “Click Track.” From here you can set the tempo, the
number of beats per measure, and the number of measures you wish the click track to
continue for. Then, when recording put on the headphones and you will hear the click track
playing while you record. See the end of this article for how to remove the click track from
your final recording.
The “Effects” menu has a variety of effects that change the audio waveform (recording)
in certain ways. They all can be applied to whole tracks or selected portions of a track.
Some of the more useful ones to use in Audacity are:
6. Change Pitch ---- use this effect to change the pitch of your tracks. Highlight your audio
and click “Change Pitch” in the “Effect” menu. In the new window, you can use the slide bar
to raise or lower the pitch of your voice. Left for lower voice, right for higher voice. Make a
change and click “OK”.
7. Amplify—use this to either increase or decrease the amplitude of a selection. It is
important to remember that this effect will make the volume of all the sounds within the
selection louder. Increase your voice and you will also increase the background hiss. Thus,
it is important to get a good recording to begin with.
8. Echo—you can decide how soon the echo follows the original (delay) and at what
percent of the original volume it echoes (decay).
9. Fade In/ Fade Out—these are preset in and out fades which slowly increase (fade in) or
decrease (fade out) the volume of a selection. Important: if you apply fades to a whole track,
it will apply the fade to reach the maximum level of volume within the track only at the very
end. Generally, you will only want to select either the beginning or end of a track when
applying fades.
10. Mixing—each track will have its own volume and panning controls. The volume is
marked with “+” and “-“ signs; the pan is marked “L” and “R.” These controls are best
adjusted after any other effects have been added to the track. Then you can balance the
levels of all the tracks, adjust where they sit in the sound field, and get the levels just right for
mixing all the tracks together.
IMPORTANT!!! When you export as an mp3, all the tracks on the screen will be mixed
together. Before you export, close out any track boxes you don‟t want: bad cuts, mistakes, and
the click track. Otherwise they will be recorded as part of the mp3.
