
Audacity Guide
Creating a Project
● Select “File” > “New”.
Importing Sound
● Select “File” > “Import” > “Audio.” An “open file” dialog box will appear. Navigate to your audio file
and choose “Open.”
● Imported audio will be added to a new track.
● Most files, such as mp3 songs, import as a stereo track, meaning there will be two tracks in the
window. This is what is supposed to happen.
Transport (aka: PLAYBACK) Controls
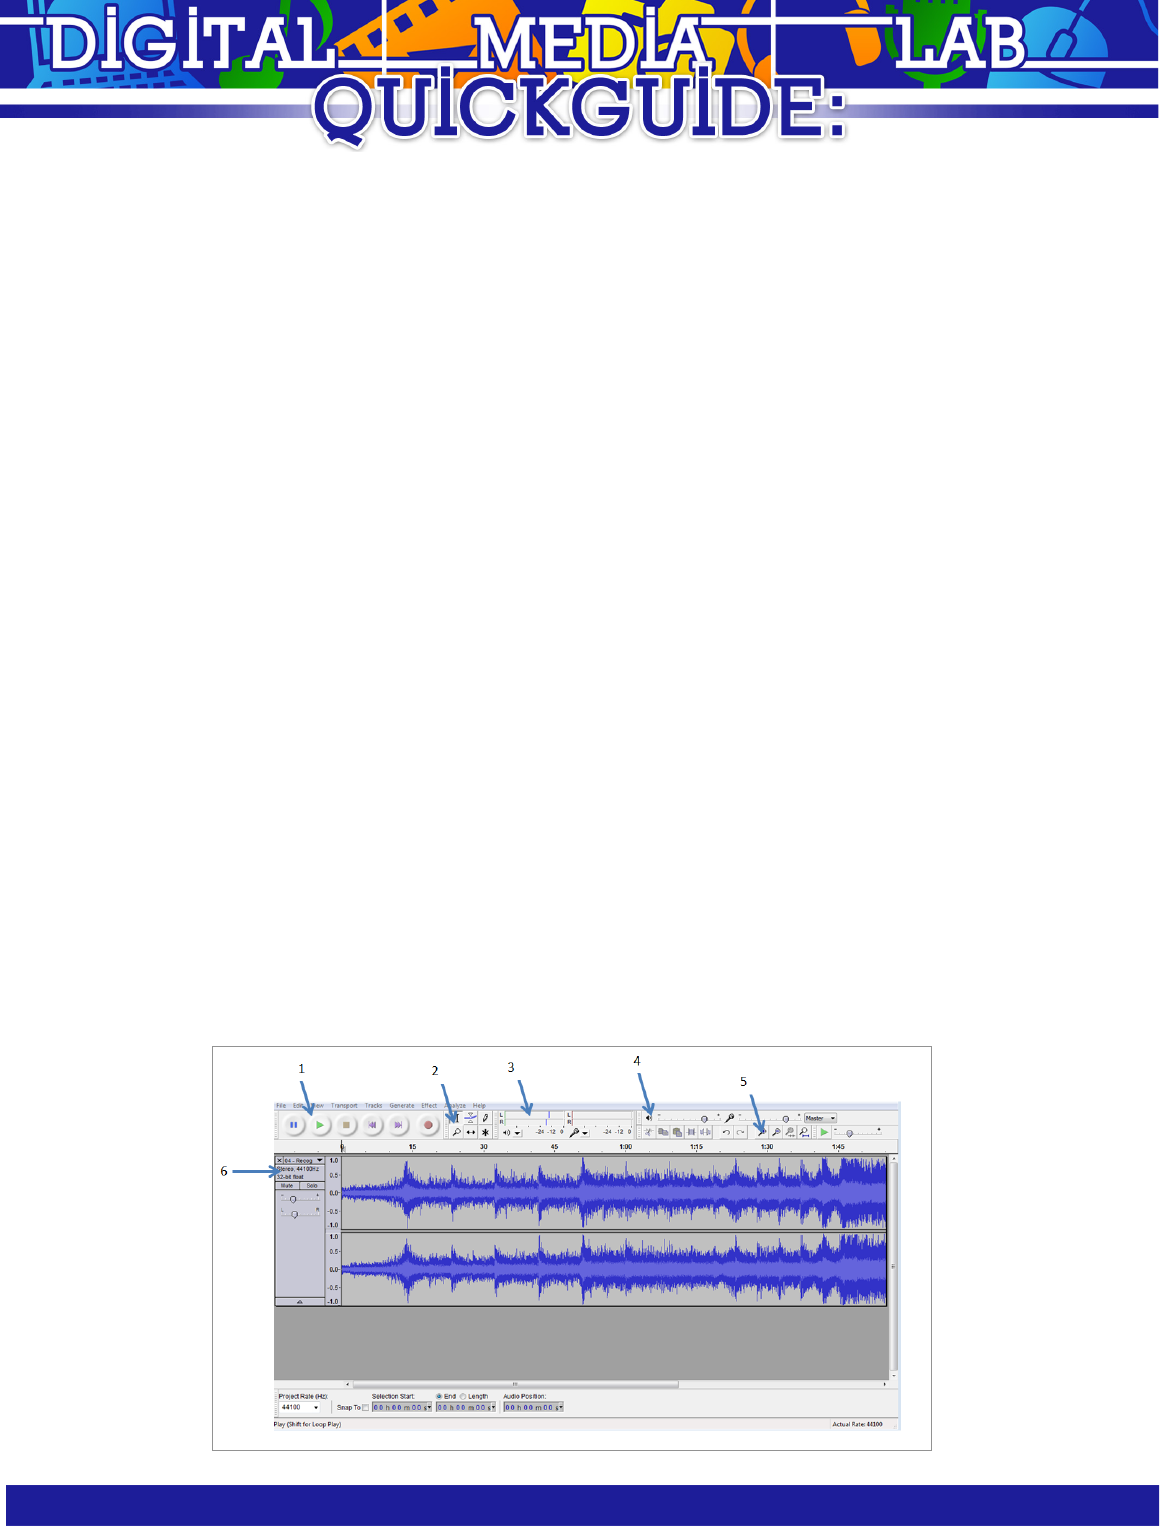
● The transport controls, such as “Play”, “Stop”, and “Pause”, can be found in the Transport toolbar
(item 1). You can also find the transport controls in the “Transport” menu.
Recording
● Be sure that the microphone is plugged into the computer before starting Audacity.
● Audacity will by default use the Windows default microphone. You can manually change this by
selecting “Edit” > “Preferences,” and then select the “Recording Device” in the “Devices” menu.
● To start recording, press the recording button on the Transport toolbar (item 1). Recording will
create a new track and start immediately.
● To stop recording, press the stop button on the Transport toolbar (item 1).
View
● To adjust the zoom in the tracks window, use the magnifying glasses in the Edit toolbar (item 5).
● To see just a selection, use the “Fit Selection” button, and to view the entire project, use the “Fit
Project” button.
Tracks
● Track Creation:
● Select “Tracks” > “Add New” > “Audio Track.”
● Deleting Tracks:
● Click on the “X” button on the upper left of the track, or select the track and select
“Tracks” > “Remove Tracks.”
Volume
● The VU meter (volume meter) can be found in the Meter toolbar (item 3), and volume controls for
both the microphone and playback can be found in the Mixer toolbar (item 4).
● The gain (amplification) and pan (speaker orientation) of individual tracks can be edited in the left
track control panel (item 5) on each track. You can also mute an individual track or have it play
solo in the track control panel (item 6).
Editing
● To reposition tracks:
○ Select the “Time Shift Tool” from the “Tools Toolbar” (item 2), and drag the track to the
desired location.
● To select sections of the track:
○ Select the “Selection Tool” from the “Tools Toolbar” (item 2). Click and drag on the track
to select a region. Selected regions can have effects applied to them and can be deleted.
● Splitting Clips:
○ Using the “Selection Tool” (See editing bullet 2), place the time selection at the desired
location for the split.
○ Select “Edit” > “Split” (Ctrl + I), and the track will be split at your selection point.
● Joining Clips:
○ Using the “Selection Tool” (See editing bullet 2), select over the two clips you wish to join.
○ Select “Edit” > “Join” (Ctrl + J), and the tracks will join over the gap.
Effects
● Use the Selection Tool to select regions for editing. Effects are only applied to selected regions.
● Change Pitch:
○ Select “Effect” > “Change Pitch.”
○ Set the starting pitch of what the tone of the track is in the “From” context. Then, set the
desired pitch in the “To” context. Preview as per necessary.
○ Select “OK” to apply the effect.
● Change Speed:
○ Select “Effect” > “Change Speed.”
○ Set the percent you want the speed to change. Preview as per necessary.
○ Select “OK” to apply the effect.
● Noise Removal
○ Use the Selector tool to select a segment of noise that you wish to remove from the track.
○ Select “Effect” > “Noise Removal,” and then select “Get Noise Profile.” This creates a
fingerprint of what the noise sounds like. The “Noise Removal” dialog will disappear.
○ Select the region of the track that you wish to remove noise from.
○ Select “Effect” > “Noise Removal.” In the “Step 2” section, set the amount you want to
reduce the noise by, and select “OK” to apply the effect.
Export
● To export your audio project, select “File” > “Export.” Navigate to the desired location, set the
name of your audio file, and set the type of audio file.
● The “Edit Metadata” dialog box will appear. Within this you can set the Artist Name, Track Title,
and Year of the file by double clicking under the “Value” column of the tag you’re editing. Once
done, select “OK.”
● If your file has more than one track, a warning will appear that your tracked will be mixed down
into one, meaning all of the tracks you were working with will be made into one. Select “OK.”
● Your song is now saved.
Congratulations! You have created a mix, song, or recording with Audacity!
